This project started with a simple idea — build a website, but one that follows enterprise level security standards. I wanted to take the concepts I'd learned in the security+ exam and actually apply them. It’s now blossomed into a playground to test and apply cybersecurity tools and concepts.
All text unless otherwise noted, is human written by me.
Initial project design phase
1. Diagrams and Naming Conventions
25/5/2025
I wasn’t sure exactly where to start and where this project would lead, but I knew I wanted to fully self-host a security blog. To do that, I needed to design and build a homelab.
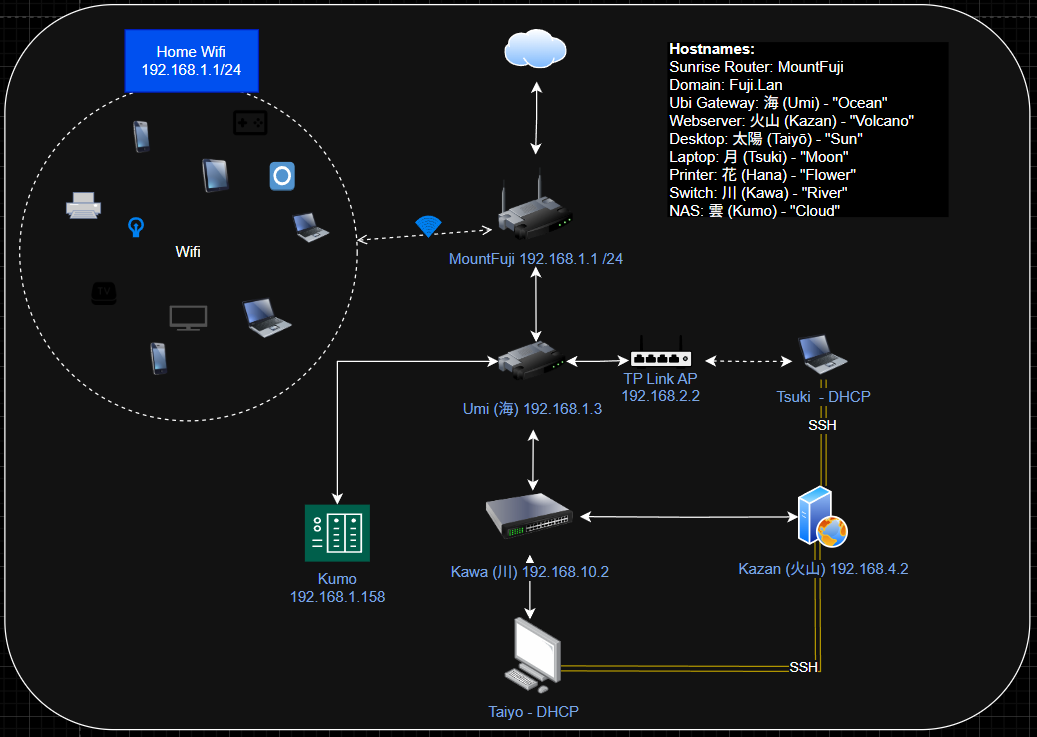
I had learned and read about the risks of hosting a website on my home network, so I knew I needed to be careful during the design phase. I decided to make my initial focus network segmentation.
To simplify the build process I decided to purchase an Ubiquity gateway to run a VPN server and a cheap TP-Link managed switch for hands on VLAN segmentation.
These devices allowed me to split my home network into several parts. I settled on the diagram below for my initial layout. This design kept my lab environment separate from my main home network and further isolates devices within the network as needed.
As you can see, the hostnames are all in Japanese. All good projects need good naming conventions. I decided to go with a Japanese nature theme.
As you can see, the hostnames are all in Japanese. All good projects need good naming conventions. I decided to go with a Japanese nature theme.
Router: 富士 (Fuji) - The ISP router mountain overshadowing everything
Gateway: 海 (Umi) - Meaning ocean, for the ubiquity gateway through which all information ebbs and flows
Switch: 川 (Kawa) - Meaning river, who flows constantly to and from the ocean
Webserver: 火山 (Kazan) - Meaning volcano, where information explodes out into all directions like a volcanic eruption
Desktop: 太陽 (Taiyō) - Meaning sun, because like me it needs rest at night
Laptop: 月 (Tsuki) - Works in synchronicity with the sun and whos dim light keeps me up later than I should at night
Printer: 花 (Hana) - Meaning flower, symbolizing its small but important part of the whole picture
NAS: 雲 (Kumo) - Meaning cloud, symbolizing it's ephemeral piece of this puzzle
It took me a long time to decide what to use as hardware for the actual webserver. Buy a used computer? Run a VM in my desktop? Rent a VPS? A Raspberry Pi? I decided in the end that I like on-metal hands on the best and didn’t want to spend more money.
I remembered that I had my old Dell Latitude laptop in my closet, and happened to have a spare SSD lying around. That should do the trick!
In terms of OS, I decided on trusty old Ubuntu. In the past during my studies I used Debian a lot, but every time I googled some issue it seemed there were always answers to my questions for Ubuntu but not Debian.
I then installed an Ubuntu ISO on a USB key using Rufus, plugged it into the laptop with the new SSD, booted to the USB and began the setup. Next thing I knew, I was logged into the familiar black Ubuntu bash shell and had a working lightweight, headless Ubuntu server.
I then went on to the basics, installing OpenSSH with passwords disabled, encrypted keys only, Fail2Ban, and UFW.
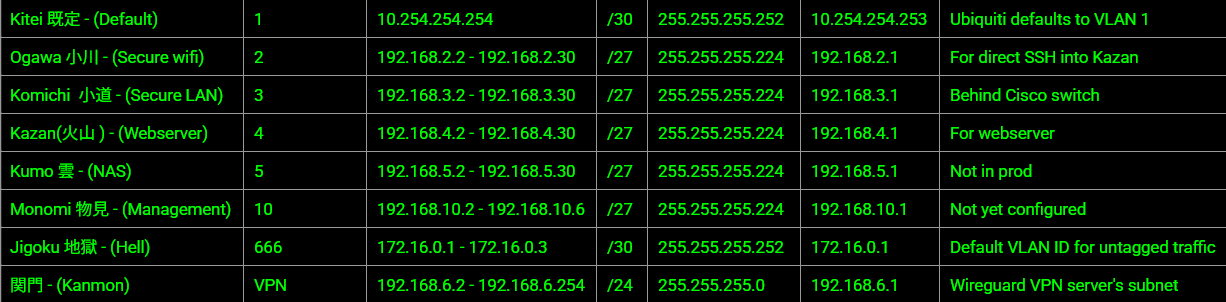
At my home lab today was a good day. After much trial and error, and even managing to completely lock myself out of my switch, I think I finally have a grasp on the concept of tagging/untagging.
Here’s my setup: Tagging all VLANs on port 1 of my switch to make a trunking port. Untagging VLAN 2 on port 2, 3 on port 3, 4 on port 4, and 5 on port 5. Then I put PVID on port 1 to 666, and mirrored the untagged setup. This way, the default VLAN 1 is completely unused on my homelab segment, and only my specific VLANs are sent across the trunk port and untagged on very specific ports.
I also on the Ubiquity side set my default VLAN id to 666 which sends to a class B 172 address that is not used anywhere else in my home lab. This way I can later set alerts to notify of any traffic going onto that port. Now it’s time to review and then move onto firewall rules to truly segment my VLANs.
10.6.2025
Today I sat down and had some fun creating VLANs. I think I went a little bit overboard for my setup. But I settled on the following:
I decided to attempt and reduce my attack surface by going with smaller subnet masks. Hopefully this doesn’t bite me in the bud later.
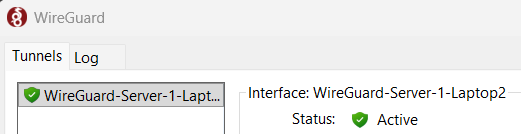
After some time away I realized I needed a way to improve my workflow for this project by implementing a VPN and integrating Git.
The whole process was pretty simple with my gateway thankfully. I just had to click to enable WireGuard in Ubiquity and set my desired VLAN, enable port forwarding for the WireGuard VPN on my home router, install the client on my endpoint, and import the WireGuard settings. I decided to go with WireGuard for ease of use.
All of a sudden I was connected to my home network seamlessly and could ping my Ubuntu server from anywhere with my laptop using VPN!
Thankfully Git/GitHub is pretty seamless to set up. In a few minutes I had an account and a repository. I created a local repo on my laptop with the basics for an Apache HTML directory, and linked it all to my GitHub using Git GUI for Windows. (yes GUI, please don’t judge me)
The next steps were pretty straight forward:
Created a new folder in my home directory called repos
Cloned my repo to this new folder using HTTPS + my GitHub account
Then did an rsync command to copy everything from the repo to the /var/www/html directory
Well, when I refreshed the main page I was now getting a 404 error on a previously perfectly functioning local Apache index.html file. 😱
What went wrong? I spent at least two hours arguing with ChatGPT, googling online, messing with file permissions trying to understand what went wrong.
It turns out I made a simple but fatal mistake. When I created the HTML file structure on my laptop I accidentally renamed index.html to Index.html. Capitalizing the index page made Apache not properly read the main page, so it broke everything. Lesson learned: capitalization in the Linux world is extremely important.
After renaming it to index.html I was able to get it working again.
Lastly, I decided I was too lazy to type out the git and rsync commands every time I wanted to update my website. I asked ChatGPT to help me write a script that I can run to do git-pull and rsync for me. It came up with the following:
Basically, it defines two variables, my repo directory and webroot directory, CDs into the repo, does a git pull, changes permissions to 755 and copies the changes.
Now my workflow is: update a file on my laptop, push to git, run a command on my webserver and voila!
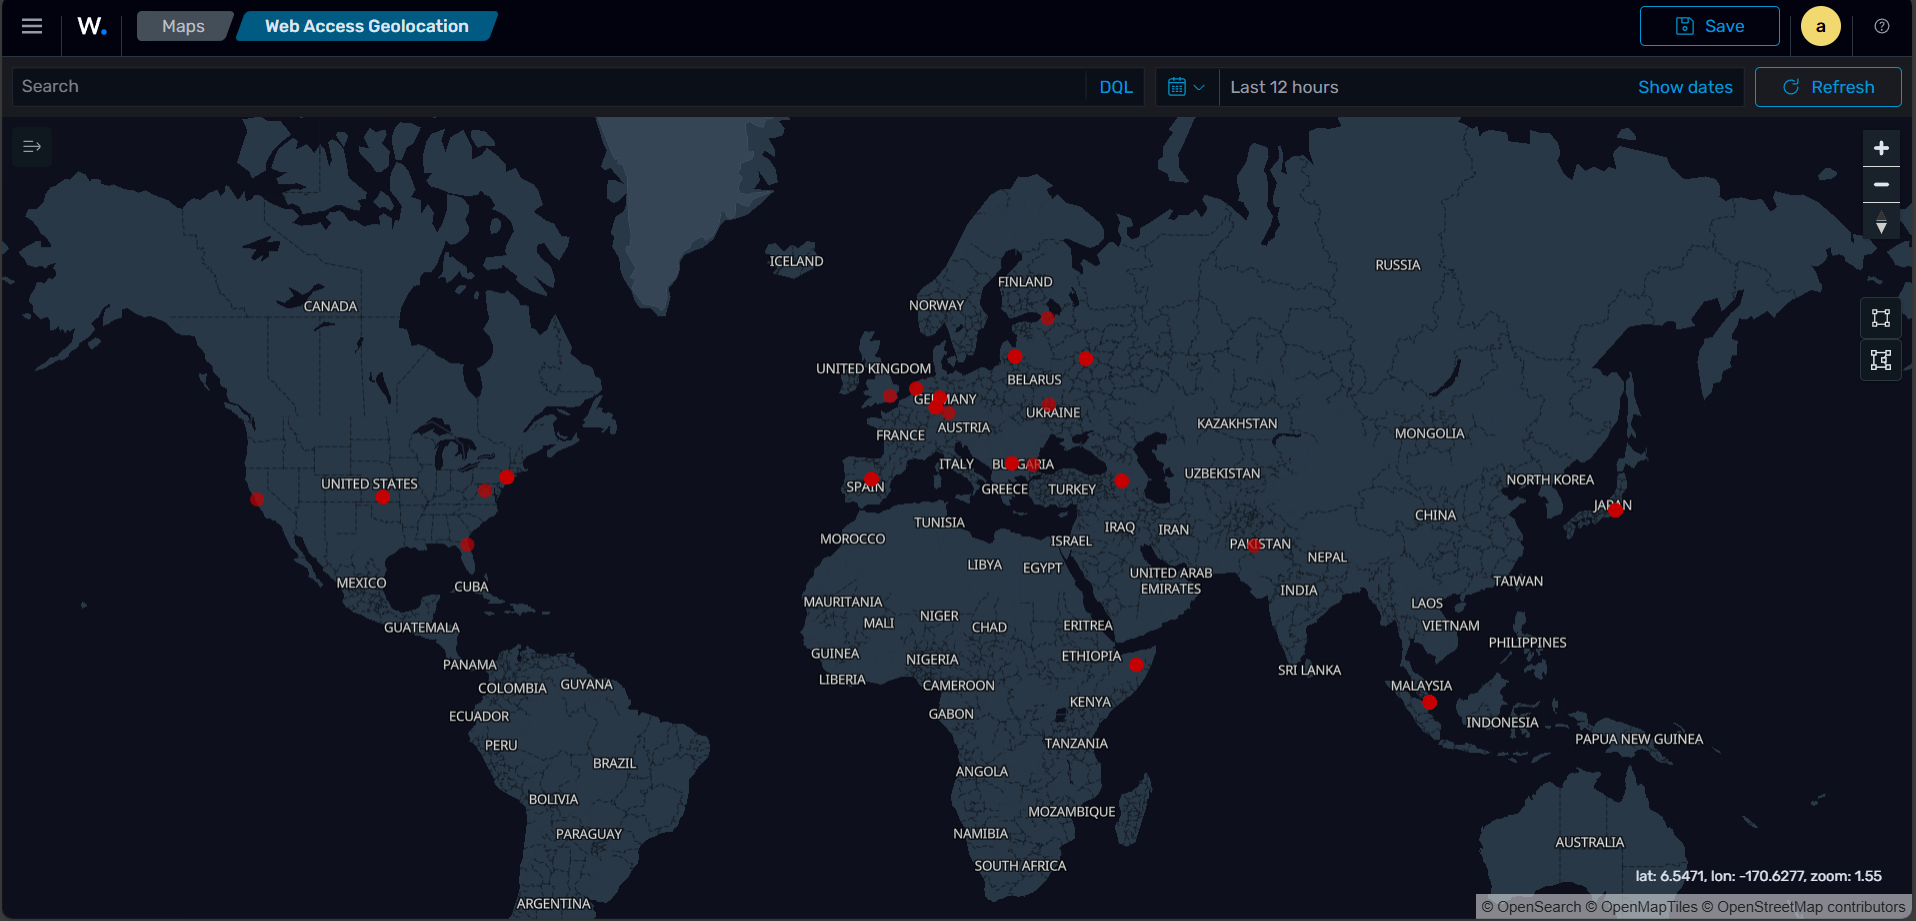
The site goes online! I forwarded the ports on my home router to my Ubuntu server. Within an hour of going live, the Apache logs revealed something fascinating:
Shortly after going live an IP address 4.230.5.99 was already attempting to access various admin PHP files. At a first glance, it looks like they were trying to gain access to PHP admin files to be able to gain control over the server and perform remote code execution.
I looked up the address using iplocation.net and it pointed to Seoul, Korea! Was my site already the target of automatic scripts written by North Korean threat actors?
The web is a scary place. Good thing this website doesn't have PHP yet. This finding only encouraged me to double down on security and revisit this event later.
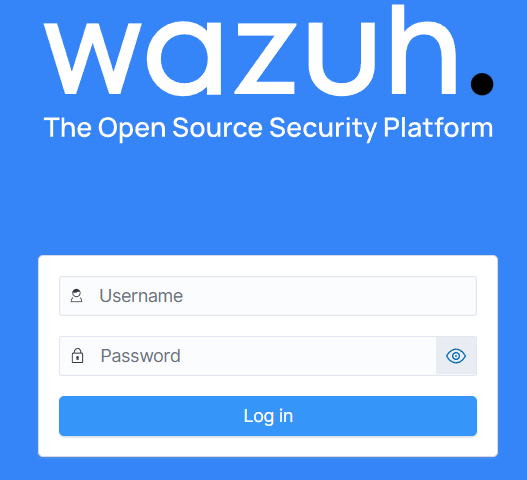
I finally decided on the next step for my homelab. Since Windows 11 is incompatible with my gaming PC, I decided to wipe Windows 10 completely and turn my gaming PC into a home server to play and experiment with — but most importantly to host my new Wazuh SIEM. It’s not ideal because I don’t want to leave it on 24/7 due to noise and electricity costs, but it will do for now.
I decided to go with Wazuh as my first SIEM because it seems to be very well documented and has a ton of robust features. It’s also available to use with Docker and I desperately needed some Docker experience. I briefly touched Docker in school but since then it’s become all the rage. I needed to at least be familiar with it if I wanted to level up my skills.
To keep my home lab simple, I converted my desktop into an Ubuntu server. I backed up all my important Windows data, and fully replaced my Windows installation with Ubuntu Server 24.04 LTS.
Since it’s not going to be public facing either I could be a lot more liberal about what I install on it. I tested out Xubuntu so I could at least be staring at something besides a dark depressing shell.
Using Xubuntu is cool at first, but I’m quickly reminded why I will likely never switch to Linux as my main driver. Linux is so great for projects and experiments, but things as simple as installing NVIDIA drivers, changing screen resolution, copying and pasting into a shell are awkward and confusing coming from the Windows world.
I did some basic hardening of this new desktop server by enabling UFW with basic rules, Fail2Ban, and installed OpenSSH to connect to it from my main Win11 laptop.
I then proceeded to attempt the installation of Wazuh using Docker.
Installing Docker Desktop seemed pretty straightforward, but I made the mistake of trying to use Linux’ GUI to install it instead of through apt. Linux people really don’t like GUIs. I think I ended up using apt to download snap and then was able to finally double click the installation file. …wait a second, so I just downloaded a downloader to download an installer that will host an installer..??
Anyways, I got Docker Desktop working, went through the tutorial and got my first hello-world Docker container going, yay!
Now to install Wazuh using Docker Compose.
I followed the instructions on Wazuh's website on how to install the single node setup using Linux and Docker. Most of the instructions were pretty straightforward and I was able to get the dashboard working and was able to login using the default credentials. Great, the dashboard is already up and running!
But Default credentials — those two words sent my security senses tingling.
Even if it’s my private homelab, it doesn’t matter — best practice dictates that I need to immediately change default credentials. It’s time to form good habits. I don’t want to one day be setting up a public facing product and accidentally forget to change default creds. I’m in security and this is security 101.
Before continuing any further, I had to figure out how to change the defaults.
Well, in the process of changing the default creds I didn’t read carefully and the documentation clearly states to only change one account at a time. I changed both at the same time AND I didn’t log out before changing them.
I ended up totally locking myself out of my own Wazuh Docker stack 🤦
I spent hours troubleshooting and managed to fix the credentials, but now there was another problem. When I tried restarting the Docker stack using Docker Compose, I kept getting an error saying that the ports were already being used.
I felt pretty defeated, overwhelmed and confused. I thought, I’m not cut out for this stuff. I decided to take a break for a while and come back with some fresh ideas.
Using AI as a helper has been extremely helpful sometimes, and completely counterproductive other times.
It turns out I managed to completely break my entire Docker stack because I naively asked AI how to make sure Docker Compose launches during startup of my server. What I didn’t know is that it was completely unnecessary to force the service to start — Docker does it automatically. AI doesn’t care or know that I don’t need to set it up, it just gladly spits out instructions with no context! I ended up with a total mess where when I turned on my server, Docker Desktop was launching by itself and eating up the ports needed for Wazuh to run.
I’ll have to erase everything and start from scratch.
All is not lost though. Going through the rabbit hole of troubleshooting these various issues has helped me better understand the stack as a whole and how Docker works.
Here’s a breakdown of my understanding of how it all works:
After pulling the Docker images from Wazuh’s git repo, Docker Compose lets me launch Wazuh dashboard, Wazuh indexer, and Wazuh manager all at the same time and have each app/container communicate to each other seamlessly. In the docker-compose file, the “master” settings dictate several key settings like IPs and ports that the container stack will run on, default credentials, and volumes. Volumes contain the only data that will stay if I restart the stack, so they contain various log files and important configuration files.
The dashboard container is simple — it just runs the Wazuh dashboard web application. The indexer aggregates and compiles logs for the dashboard to read. Finally, the manager handles communication between the containers and run manager-specific tasks.
Once the containers are launched, I can open a bash shell inside a container using:
docker exec -it single-node-wazuh.indexer-1 bash
Once inside, I can run various tools inside the containers, such as the password reset tool which I needed to change the default credentials earlier.
With renewed vigor and motivation, I attacked the problem the way any sane IT worker would — reformat everything and try again!
Armed with my experience from my previous failures, I deleted every trace and instance of Docker and Wazuh and built the whole thing again from scratch.
I finally got the Wazuh Docker stack up and running and hardened the basic settings.
I struggled for over an hour because their documentation was out of date and I thought I could only connect to the API using wazuh:wazuh. At least, I think so because I couldn’t find any single trace of an account named simply “wazuh” anywhere in my config files or dashboard.
But I managed to change the default credentials for the admin account and API account, and reduce the attack surface by only pointing the Docker network interface to my local server’s IP.
I even deployed agents to my main 3 endpoints — my daily driver Win11 laptop (Tsuki), my Apache Ubuntu webserver (Kazan), and my new Docker Ubuntu host server (Taiyo). The deployment process is quite easy, although I wish they offered more options to pre-configure the agent before deployment.
I also managed to set up File Integrity monitoring on my laptop’s download files, just for testing purposes, but quickly realized it bogs up the alerts. Need to modify or remove it later.
It was overwhelming at first to implement such a complex app (Wazuh) inside another complex app (Docker Compose). This being the first time ever using Docker or even messing with a SIEM I think I did a decent job throwing it all together.
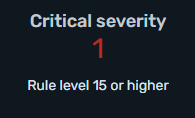
It’s easy to see how a large company would be totally drowning in logs. Even in my tiny home lab with 3 endpoints I have over 1300 alerts, and I just started.
My first accomplishment so far with my Wazuh SIEM has been to see where the IPs of automatic exploits are being run from. So I made a dashboard and filtered for any WebAccess attempts to my webserver. If I understand correctly, Wazuh already has an automated filter that takes logs from my Apache web-access log (I added the <localfile> entry to the agent ossec.conf file that points to my /var/www/html directory). Wazuh then decodes those logs, filters using its decoding rules, and creates an alert.
It looks like an automatic probe sending a GET request to search for a seemingly random PHP script on my webserver. Maybe trying to exploit a known pattern in common web apps that create scripts on their search directory using similar or the same naming convention.
I tried digging more into where this address is located physically. It looks like there’s a mismatch with how my SIEM is grabbing geolocation data. According to WHOIS the IP is coming from Hong Kong, but it was physically registered in Singapore. Looking up the physical address points to a random large building that houses several unnamed businesses.
No matter where these access attempts are coming from, this is interesting. My inconspicuous website with nothing of interest is constantly being probed, poked, and prodded by IP addresses all around the world.
It looks like the alert is of an initial access attempt using a shellshock attack. It seems they're sending http Get requests to try and launch some sort of .sh script and maybe forwarding it to this strange bang2012@tutanota.de address.
I began my first incident response. This is where I realize I didn't even have a gameplan on what to do in these kinds of situations. My first instinct was to check the CVE to get an idea of what I'm working with.
Here's what CVE.org says about this CVE:
GNU Bash through 4.3 processes trailing strings after function definitions in the values of environment variables, which allows remote attackers to execute arbitrary code via a crafted environment, as demonstrated by vectors involving the ForceCommand feature in OpenSSH sshd, the mod_cgi and mod_cgid modules in the Apache HTTP Server, scripts executed by unspecified DHCP clients, and other situations in which setting the environment occurs across a privilege boundary from Bash execution, aka "ShellShock."
Next I copied and pasted the logs into ChatGPT and asked to guide me through a full incident response. I wanted to be really sure this attempt didn't go through.
Here's how it suggested I respond:
I immediately created a rule that blocked the malicious IP address in both UFW and Ubiquity.
I then made a “forensics” folder and exported all relevant logs:
I discovered my new favorite fish-flavored command → ss -tunap. This command allows me to quickly see detailed information about all TCP and UDP sockets.
Then I used grep to pull out any logs related to the incident:
No logs returned any noticeable successful connections. Looks like a false alarm, but we’ve proven that no one has been able to get in (hopefully).
Since nothing really stood out with the above commands, I thought it would be a good idea to establish a baseline to compare against for future incidents. I documented them all into a document named "baseline" for future reference
It looks like having an extremely minimal attack surface has saved me so far. I don't have PHP, javascript, mysql, or any fancy modules running on this website. Yet.
This incident gave me some good hands on incident response experience, some useful commands to understand more deeply, and also reminded me that I need to harden my Apache server and disable any unnecessary modules.
This project is really coming together and starting to feel like actual security work. Hopefully my AI generated incident response plan was alright. I'll need to formalize a process and see what the industry standard is.
My first Threat Intelligence Report
25.10.2025
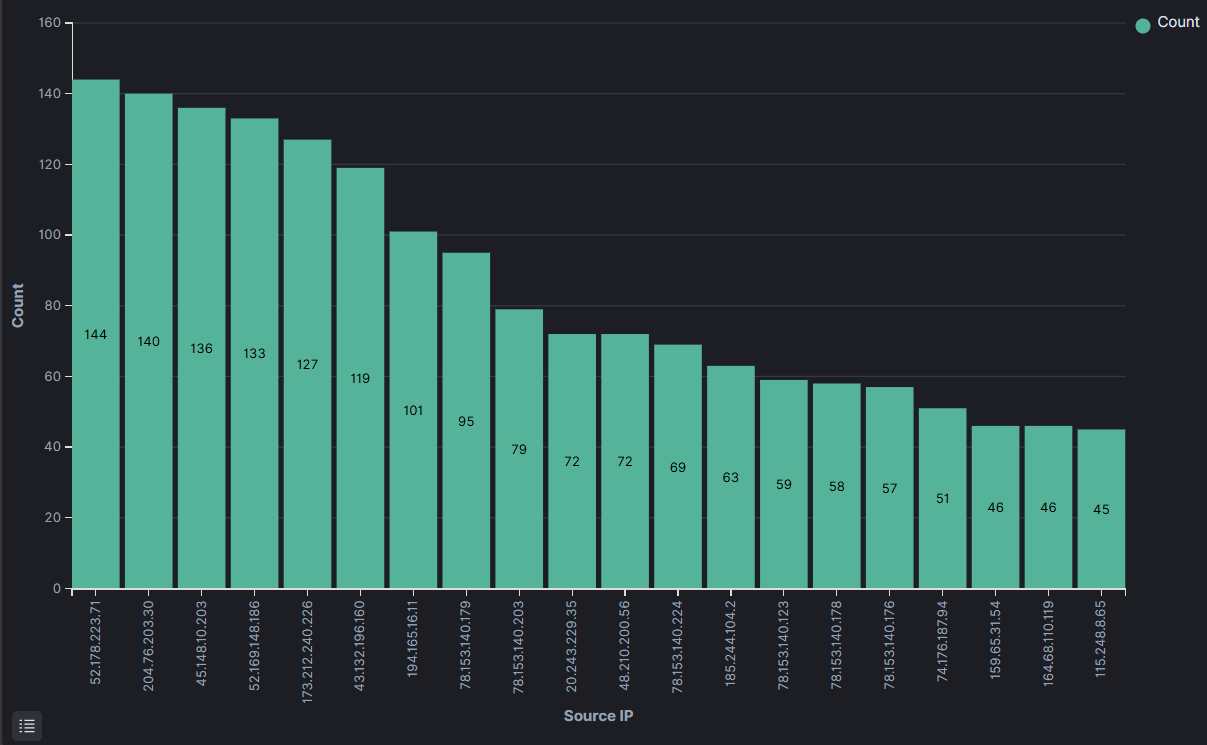
I went poking around in my Wazuh dashboards and visualizations and decided I wanted more information on who is trying to probe this site.
I went into visualizions and after alot of playing around I finally was able to create the table below.
This chart takes any IPs that have raised an alarm in my SIEM and orders them by the amount of times they have raised an alarm. As you can see, there's one that sticks out:
52.178.223.71
It hammered my site a wopping 144 times!
I decided it's time to dial in my efforts, get as much information I can about this specific IP and write a detailed report about what this IP is doing.
Hopefully the information in this report can be used in idenitfying future threat patterns/actors. Or maybe it will be lost in the tsunami of constant probes.
I'm immensily curious about these persistent probes. They are like scouts being sent into enemy territory looking for any information that could be useful.
If we had more information about them, or better ways to mitigate agains this kind of probing, could we make the internet a safer place?
Lessons learned: there are many constant threats coming in, but taking the time to study one in detail is one step closer to understanding the enemy and one step closer to security.
After some much needed time off, I've returned to the project with fresh ideas. After getting feedback from friends and family, I created a section for less-technical people.
Should there be a demand for it, I'll flesh this part of the project out more. But for now am more interested in diving deeper technically.